Thursday, March 31, 2011

Get Well Card

Hi everyone. Today I've got a Get Well Card and personalized book marker that I made for my bloggy friend Georgiana's sister. She was in a pretty bad car accident and broke both of her feet :(
inside of card:
I'm sorry I didn't get a chance to write down all of the specs for this set. I was kind of in a hurry so that I could get it in the mail with the same trip. (Our mailman doesn't come daily like he's suppose to. It seems that if he doesn't have mail for us he just drives by without even checking for outgoing mail. I have seen this on two separate occasions with my own eyes!! Crazy huh?! Just another reason I really don't like this city). I do know that the "get well soon" is from the Cindy Loo cartridge, p. 69, cut at 2 inches. If you'd like to make a card for Erica too, check out Georgiana's blog at http://carsonscricutcreations.blogspot.com/


Thanks for stopping by :)

New Award! :)

Hi everyone! I just wanted to share with you all a new award I've been graciously given by the ever so talented Pat over at http://patsscraps.blogspot.com/
Thank you Pat!! :)

The requirements of accepting this award are:
1. Thank the person who gave you this award.
2. Share 7 things about yourself.
3. Pass the award on to 5 other bloggers, and let them know.

Here are 7 things about myself:
1. I started card making this past October when my mom and sister gave me the best early Christmas present ever, a Cricut Expression :)
2. I am the youngest of three, but the first in my family to graduate college :)
3. Even though I love love love my son and love staying home with home, I miss working.
4. I have two fur babies, a Shiba Inu named She-Ra, and a house kitty named Mr. Jax, but if it was up to me, we'd buy a farm and have a house full of critters :)
5. My father was a career Marine, and my whole life growing up I wanted to be a fighter pilot :) It could never happen though as I have less than perfect vision :(
6. My husband wanted to be a fighter pilot growing up too, but when he went to join, they said he couldn't fly because he's color blind. I like to think that even if we had both had perfect eyes and did become pilots that we would have met anyway :)
7. If I could chose between traveling and living in the future or going back and living sometime in the past, I would chose to go back and live in the 1940's or 50's, when life was so much simpler and people weren't as crazy as they are today.  

And here are the 15 blogs I'm passing this along to:

I follow and absolutely love every single one of these blogs, so if you get some free time head on over to them, check 'em out, and maybe say hello :)

Thanks for stopping by! :)

Wednesday, March 30, 2011

My Favorite Baby Girl Card

Hi everyone! I've just got a quick card to share with you guys but I am very excited for this one because it is my very first card using a Peachy Keen stamp! :) I won them in a blog hop from Raven over at love4stamps.blogspot.com (thanks again Raven!) I hope you all like it as much as I do :)
 inside:
 close ups:
I used colored pencils to color in the eyes and give her the rosy cheeks :) 

Recipe:
  • Flower shaped card from Wild Card cartridge cut at 5 3/4 inches
  • Baby cut from B is for Boy at 3 1/2 inches
  • Bow for hair from Simply Charmed baby at 3 1/2 inches
  • Peachy Keen Wide Eyed Kids Face Stamp (1 inch)

Thanks again for stopping by! :)

Monday, March 28, 2011

Spring Blog Hop Candy Winner!! :)

Hi everyone. I apologize for it being so late, it's been a busy day and I am just getting to sit down at my desk for the first time. The lucky winner random.org picked for the Paisley cartridge is......

Rexann! (AKA Craftaholic)

She said, "Love your amazing Project, It is Beautiful!! My favorite time in spring is to hear the birds sing and Chirp!! It is always comforting to me!! Garden planting is just around the corner! Im a new friend and would love to have you as my new friend as well!! Thanks for the Chance at the super cool Blog Candy!!"

 
Congratulations Rexann! Thank you for your very sweet comment :) I am emailing you now for your shipping info :)

Friday, March 25, 2011

Spring Blog Hop

Hi everyone! Welcome to our Spring Blog Hop hosted by Jen over at www.jenscraftcorner.com
If you've come here from Lisa over at www.crop-and-create.blogspot.com
      then you're on the right track. If not, head on over to Jen's blog to start at the beginning. I'll have the full line up down below just in case :) 

I hope you all enjoy my bouquet of flowers!
some close ups:
I got my inspiration for this from Andrea over at Divine Domesticity back in January when I saw her design team challenge project here: http://divinedomestic.blogspot.com/2011/01/mps-design-team-challenge.html Hers did so well she actually won!
I sat on the idea while working on other projects, but when Jen asked me to be in her hop and said the theme for it was Spring, I knew it's time had come :)
My favorite part of Spring is all of the incredibly beautiful flowers in bloom. My favorite are the Japanese Jane Magnolia's. Since they bloom in pinks and purples (and of course, pink matches my craft corner), I decided to use different shades of each.
It took a few days to complete. It has A LOT of flowers! Here it is sitting in it's new home in my craft corner:
I used the flowers from the Plantin Schoolbook cartridge-the base cut, shadow cut, and italic cut, all at 1 inch, 1 1/2 inch, and 1 3/4 inches. I used two to four layers (in different colors) for each flower, then used a sewing pin to attach them to the styrofoam ball (mine is 5 inches). My spatula helped me fold all the petals up to give them more dimension. The little pink pail is from Target's dollar spot, and the stones I used to weigh the pail down can be found pretty much anywhere. I think I got mine from the dollar store.

Now on to the candy! How'd you like to win this? :)
To win you don't have to be a friend (follower), but new friends are always welcome :) Just leave a comment on this post telling me your favorite part of Spring, or your favorite Spring memory, or anything else you want (be sure to include a way for me to contact you). I'll draw my winner Monday evening using random.org. Good luck! And thanks again for joining us! :)

Thursday, March 24, 2011

More Baby Girl Cards

Hi again! This is my second post of the day so be sure to scroll down for the info on our upcoming Spring Blog Hop :) I just came back real quick to share a couple of more baby girl cards I made this past week.
Here's the first:
 I used the baby from Stretch Your Imagination at 3 inches and the oval scallop cut for the sentiment is from the Storybook cartridge at 2 3/4 inches.
For this next one I used the baby and stroller from Simply Charmed at 2 3/4 inches.
 Both cards have the same interior. This is from the Storybook cartridge as well (p.36) at 2 1/2 inches 
I don't know why the photo came out so blurry, but the poem reads,
"A tiny little baby
So innocent and sweet
Will bring love and happiness
And make your family complete"

I think I like these more than the first one I made, but my favorite of the bunch will have to be revealed later (I'm still waiting on a package with something I need to finish it).

Upcoming Spring Blog Hop

Hi everyone!! I'm sorry I was gone for a few days. I finally got back online yesterday but I spent all of my time catching up on some wonderful posts that I missed. I'm sorry if I haven't gotten to visit you yet, I'm still playing catchup, and I will get there! It's been difficult here this week with limited internet, a sick two year old, a sick husband, and a handful of craft projects all going on at the same time.  
Amidst all of the busyness, I was able to finish a few more cards and get my project done for our upcoming Spring Blog Hop this Saturday :) It took about three late nights to finish, but I'm happy with it and very excited to share it with you guys! I hope to see you here hopping with us Saturday! There will be blog candy along the way! :) 
Here's our lineup:

Friday, March 18, 2011

Easy Peasy Stoplight :)

Hi everyone! I've got a really easy, super quick project to share with you :)
This past week we transitioned J.R. from a crib to a big boy bed! We bought him one of those cool race car twin beds for Christmas and finally set it up Monday :) 
The previous theme was sports, but now that it's cars, I've got a lot of redecorating to do. Since we don't have a lot of money for this, anything that I can make with my Cricut is a plus! I decided to start with this:
While I was breaking down the box that his new bed came in the idea came to me. It was done in seriously about 10 minutes!

Recipe:
  • cut the rectangle cardboard to the size you want (in my case, just over two feet)
  • cover the cardboard in black cardstock (I used my ATG and just wrapped it around)
  • cut three white circles at 6 1/2 inches (mine are from Plantin Schoolbook)
  • cut three more circles-one red, one yellow, one green at 6 inches
  • glue pieces together and voila! you've got a traffic light :)
So easy! :) I liked it so much I actually went back and made another one for the other side of the windows :) Here they are up in his room.
I'm working on a "Vroom Vroom" sign to go above the bed and will post pics of that too once it's all done. If you have any ideas for any car related cut outs or crafts I can make please let me know :) I'd love to hear them! :)


Thanks for stopping by! :)

Thursday, March 17, 2011

It's A Girl Baby Card

Hi everyone. Hope you're all doing well. I've got a cold compliments of my little man. I'm not going to complain though because he's the one fighting not only a cold but a double ear infection as well :( Poor little guy :( 
Since he's been sick I haven't had much time on my hands for card making or any other crafts, but I did manage to get one of the several new baby girl cards I'm going to need over the next few months. It's not my best work (probably due to the sleep deprivation and/or me rushing to get it done before J.R. wakes up from his nap), and I know I can do better. Hopefully I'll get some more time later or tomorrow to try again....anyways, here it is:
I made a matching envelope to go with it:
the inside of the card and back of the envelope (once I know the baby's name I will add their first initial in the bow frame):
Recipe:
  • carraige card from the Wild Card cartridge cut at 5 1/2 inches (top layer and rattle also cut at 5 1/2)
  • "special delivery" cut at 3 1/2 inches
  • baby face from the Simply Charmed cartridge cut at 3 1/2 inches
  • 5 x 3 1/2 inch background piece for inside
  • Different size rectangles starting at 4 x 1 1/4 inches and getting smaller for the "It's A Girl" strip (this is where "too much" ended up being a negative for this card, I think)
  • envelope cut at 6 inches (I'm sorry I forgot to write down what size I cut the oval fram with the bow at)

Well, like I said earlier, I know it's not my best work, but at least I'm happy with the envelope :) Actually taking a second look at this I realize I forgot to add a layer inside for my message! Woops! LOL! I'll have to add that later.

Thanks again for stopping by! :)

Wednesday, March 16, 2011

Simply Charmed Birthday Card

Hi everyone! I'm so happy to be back in my crafting groove :)  Now that we're not moving in less than a month I have much more "me" time, and I am taking full advantage of it while I can! :)
Today I have another birthday card to share. This one was made for my husband's grandmother whose birthday was Saturday. Everything was cut from one of my favorite cartridges, Simply Charmed. 
inside:


Recipe:
  • wedding cake cut with layers at 4 1/2 inches
  • balloons with first layer at 4, 3 1/2, 3 1/4, and 3 inches
  • cuttlebug swirly embossing folder for background swirls  
*I used pearlescent cardstock for everything to give it that pretty shimmery look* 


Thanks for stopping by! :)

Tuesday, March 15, 2011

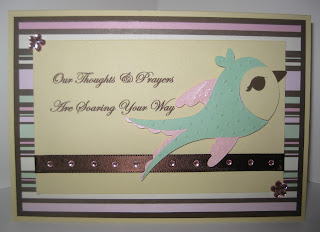
Soaring Prayers Card

Hi everyone. I've got another card today. Unfortunately it was made for less then happy cicumstances :( It is very pretty though, and if the sentiment were changed it could definitely be turned into a happy card, so I thought I'd share it with you all.
inside (sorry the photo came out so dark):
close up:


Recipe:
  • 6 1/2 x 9 inch cardstock base
  • bird from Cindy Loo (p.64) cut at 2 1/2 inches with layers (I used the Cuttlebug's tiny dots folder to emboss the body)
  • 3 1/4 x 51/4 for background layer with sentiment (I typed and printed the sentiment up with my computer)
  • 4 x 6 patterned paper for background
  • 4 1/4 x 6 1/4 solid accent color for frame
  • 6 1/2 inches of ribbon of choice
  • stickles for wings and tail feathers
  • gems for the corners and to bling up the ribbon
  • pop dots for the bird

Monday, March 14, 2011

Un-du Challenge Card

Whew, I made it! Hi everyone :) This is the card I made for Karen's Un-du Challenge. The challenge ends the 15th (I know I'm cutting it close!), and is for a chance to win a newer crafting product called Un-du. The requirements are to use the colors black, white, red, yellow, and lime green.
 I was pretty stumped on what to make with these colors at first, but then when looking for daycares and preschools for my son, I thought of this card for a teacher:)

inside:
(that little apple on the inside is a sticker I had left over from a Thanksgiving set my mom gave me last year)


Recipe:
  • 6 x 8 inch cardstock base
  • 4 x 5 3/4 background paper (I embossed it with the Cuttlebug folder that looks like  fancy leaves)
  • cherry from Create-A-Critter (p.36 Layer 3/shift) cut at 4 1/2 inches. I didn't have an apple so I decided to just cut the stem shorter and tada! Cherry turned apple :)
  • leaf for stem (I cut this one by hand, but almost any leaf will do)
  • 2 x 2 square topped with sentiment (I used the diecut that came with my Cuttlebug to stamp the sentiment on)
  • white jelly roll pen for doodling
  • ribbon and stamp from Michaels $1 bin
  • pop dots for the apple


Challenge:
Un-Du Challenge at http://karens-kakes-krafts.blogspot.com/2011/03/un-du-challenge.html


Thanks again for stopping by! :)

Happy Birthday/Cricut Cardz Challenge 9 x 4 Challenge Card

Hey everyone! I finally got my 9 x 4 card finished today! :) I had tried it yesterday but ended up with crafters block and decided to put everything away and try again today. I'm so glad I did because after making my first frame card I knew what I wanted to do for this one, and here it is :) I hope ya'll like it :)
inside:

I added the ribbon like this so that I can tuck some money in for the birthday boy :)

close up of embossing:
I embossed the "happy birthday" cut and then colored each dot with a brown colored pencil because it was looking a little plain.

Recipe:
  • 8 x 9 inch cardstock base
  • 7 7/8 x 3 7/8 top layer
  • happy birthday cut with shadow cut at 2 1/2 inches from Simply Charmed
  • 8 x 3 inches for inside layer
  • matching ribbon
Frame recipe:
  • 4 1/4 inch square double sided print paper
  • turn diagonally and score at 1 and 1/2 inches on all four sides
  • fold at the outermost score marks inwards
  • fold the interior score marks outward to make the frame (I added pop dots under the folds to add more dimension, but be sure to wait until you finish adding the image to the interior of the frame)
  • 2 7/8 inch square for the base of what's being framed
  • add your sentiment (or image)  
Challenge:


Thanks for stopping by! :)

Sunday, March 13, 2011

Hoppy Easter Wall Art

Hi everyone! Happy Sunday! I hope everyone remembered to change their clocks last night. While overall I find the whole daylight savings thing kind of a bit of an annoyance, I am looking forward to the extra hour of sunshine with my family in the evenings :)

Now for my project :) I am SO excited to share it with you guys! I hope you like it as much as I do. I worked on it over two days putting lots of detail in it, including a couple of firsts for me. When she was done my honest reaction was, "Wow! This came out much better then I thought!" :) Probably because the first three times I thought she was "done" I'd think of something else to add, lol. Here she is, my Hoppy Easter Bunny :)

She's almost two feet tall! :) I started with just the bunny herself and then used a white painters marker for the doodling around her. I cut her from one of those three-pack boxes of cereal using a 12 x 24 mat and the CDS. I added some stickles to her ears and cheeks, but decided she needed even more!

Soooo, I made her a "Hoppy Easter" banner to hold up!
As you can see I used stickles on all of the letters, polka dots, and on some of the layers of the flowers.
The carrots were embossed with two cuttlebug folders, the tiny dots one and the one that looks like tree sticks (I'm sorry I don't know the correct names for them), and then I used a white jelly roller to color in the dots on the leaves.
I chose to use matching purple craft twine to tie the carrots together instead of my traditional brads or ribbon (I punched holes and set white eyelets in to run the twine through). All of the letters with their shadows were cut from the Storybook cartridge.
The flowers each have multiple layers of different shades of purple, topped with white, and held together with purple flower brads. I rolled each layer inward to help give it a more realistic look. It was my first time trying this technique and I think it turned out very pretty :)
Now this is probably my favorite part of her, her super cute flower ear bow :)
I made this by trying that scrunchy ribbon technique I've seen used around on so many blogs (again I apologize for not knowing the correct term for it). All I did was use a needle and some purple thread to sew a zig zag pattern through the middle, then bunched the ribbon together. The flower is the same as the others, just more layers :)

Thank you all so much for taking the time to stop by! :)

Saturday, March 12, 2011

My First Frame card! :)

Hey everyone! While I was participating in the Fun Fold Challenge I saw this frame card and just had to try it! I loved it so much I actually made two :) Then I found out that you can enter this challenge as many times as you want so long as each entry is a brand new card made specifically for the challenge! :)  So here's my second entry. (You can see my first entry on my previous post).

 
here's the inside:
and here's a close up of the frame:

 
Recipe:
  • 5 1/2 x 10 7/8 cardstock for base of card
  • 5 inch square patterned paper for frame's frame (I'm not sure if that's the crafters technical term for it, but it's what I'm going with, lol)
Frame Recipe*
  • 4 1/4 inch square double sided print paper
  • turn diagonally and score at 1 and 1/2 inches on all four sides
  • fold at the outermost score marks inwards
  • fold the interior score marks outward to make the frame (I added pop dots under the folds to add more dimension, but be sure to wait until you finish adding the image to the interior of the frame)
  • 2 7/8 inch square for the base of the sentiment or image to go inside the frame
  • add your sentiment (or image) 
  • wrap the ribbon around and glue down on the inside of the card
  • add your bows or any other embellishments :)
Inside recipe:
  • 4 inch square topped with:
  • 3 1/4 inch square
  • I also used an old flower punch, and hand cut some Easter eggs out of left over scraps to help dress it up 
*I found the tutorial for the frame here, just in case my instructions were confusing: 

Challenge:

 
Fun Fold Card Challenge at http://www.pausedreamenjoy.blogspot.com/


Thanks for stopping by! :)
 

Friday, March 11, 2011

Triple Challenge Easter Card

Hey everyone! Happy Friday! :) Thanks so much for taking the time to visit my blog. If you're a first timer, welcome! I hope you enjoy what you see. Today I have what I think (although I may be biased) a super cute Easter card.

here's the front:
crack open the egg and inside you have:
close up:
Recipe:
  • 4 x 12 cardstock base scored at 2, 4, 8 and 10 inches
  • fold inwards at the 4 and 8 mark, and outwards at the 2 and 10 mark
  • using two separate patterns cut one 3 3/4 square piece, and one 3 1/2 square piece
  • cut four pieces at 3 3/4 x 1 3/4 (two in each pattern)
  • cut four pieces at 3 1/2 x 1 1/2 (two in each pattern)
The first set of layers should be glued on like this:
when you attach the second layer it should look like this (notice that the two outside top layers line up to touch when the card is closed):

using Create-A-Critter:
  • cut two cracked eggshells (p.53), one at 3 inches and one at 2 inches (you'll only use the bottom of this cut for the inside)
  • cut the coordinating chick with layers at 2 inches
  • cut the circle from p. 62 (phrase shift) at 3 1/2 inches
  • cut the scallop flower (also p. 62) at 3 inches

using Stretch Your Imagination:
  • cut two sunflowers with layers (p.37) at 2 3/4 inches
  • attach your cutouts (be sure to glue one half of the front eggshell to each side of the card, making sure they line up correctly when the card is closed), add some doodling, and glue your buttons (or other embellishments of your choice) on :)

Challenges:

Thanks again for stopping by! :)

Thursday, March 10, 2011

Paper Mache Easter Bunny Basket

Hi everyone! I hope everyone is having a great week so far. I have been working on a couple of Easter themed projects that I wanted to share with you, and here's the first.


I bought the oval shaped paper mache box from Michaels and painted it white.  I then used my cricut to cut out the bunny face, tail, grass wrap around, and the eggs. I glued those on (I used pop dots for to attach the eggs to give it a little more dimension), and added some googely eyes, punched a hole on each side to set some eyelets in, threaded the ribbon through for the handle, and filled with sweets :)
Aside from letting the paint dry this was a super quick and easy peasy project that turns out, I think, really cute :)

Recipe:
  • bunny face from Doodlecharms cut at 3 1/2 inches
  • eggs from Doodlecharms (border/shift Easter basket) at 2 1/2 inches
  • bunny tail from Create-A-Critter (shift/phrase pig) at 2 inches
  • grass wrap around from Simply Charmed (layer 4/shift turkey) at 5 3/4 inches

Thanks again for looking!